Best Drainage Improvements to Pair With Basement Waterproofing

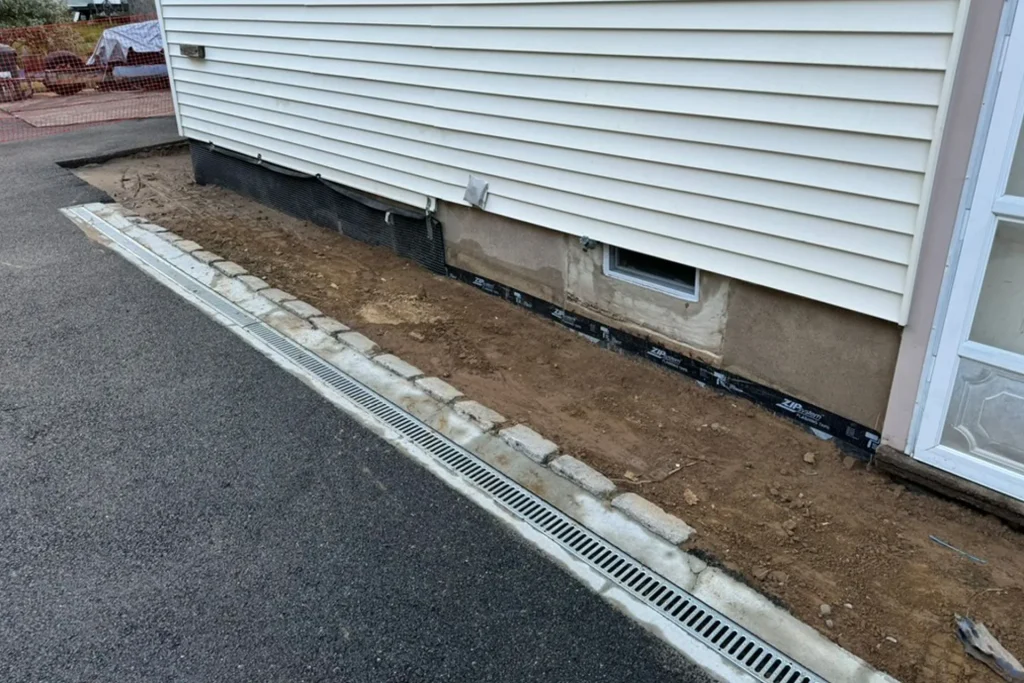

A dry basement rarely comes from one fix alone. In most homes, true moisture control is the result of several systems working together, each handling water at a different stage. Basement Waterproofing may stop seepage at the wall or floor, but if rainwater keeps collecting against the foundation, the pressure never really goes away. That is when small weaknesses turn into recurring leaks, damp air, and expensive callbacks.
Homeowners often focus on what they can see inside the basement: a stain on the wall, a musty smell, a puddle near the furnace. Contractors with field experience usually start outside. They ask where the roof drains, how the lot slopes, what kind of soil surrounds the house, whether the gutters overflow, and whether the neighbor’s yard sheds water toward the foundation. Those details matter because a basement can be waterproofed correctly and still struggle if drainage is poor.
I have seen this play out on homes of every age. A well-installed interior drain tile system and sump pump can keep a basement usable, but when downspouts dump water a foot from the wall and the yard pitches inward, the system runs far harder than it should. That means more wear on pumps, higher humidity, more freeze-thaw stress at the foundation, and a greater chance of eventual failure during a heavy storm. Pairing Basement Waterproofing with drainage improvements does not just reduce leaks. It lowers the water burden on the whole structure.
Start with the water path, not the symptom
Rainwater follows a predictable path. It lands on the roof, moves into gutters, exits through downspouts, and then either disperses safely away from the home or concentrates near the foundation. Groundwater behaves differently, but surface water is often the first problem to solve because it is visible, measurable, and surprisingly destructive when mismanaged.
A common mistake is treating all basement moisture as groundwater intrusion. Sometimes the main culprit is much simpler: overflowing gutters during a storm, short downspout extensions, or a flower bed built up against the house over the years. Even an inch or two of negative grade can direct a large amount of runoff toward the foundation wall. On clay-heavy lots, that water may sit for days because the soil drains slowly. During wet seasons, hydrostatic pressure builds against the basement wall and floor slab. That is exactly the pressure Basement Waterproofing systems are meant to resist, but reducing the pressure in the first place is always better.
The best drainage improvements work by interrupting that path early. They catch, redirect, disperse, or drain water before it can saturate the soil around the basement.
Gutter and downspout upgrades do more than most people think
If I had to pick one drainage improvement with the highest return for the lowest cost, it would be upgrading the gutter and downspout system. Not because it solves every problem, but because it addresses so many of them at once.
A typical roof can shed hundreds of gallons of water during a single strong rain. On a larger home, the volume can be much higher. If gutters are undersized, clogged, pitched incorrectly, or missing outlet capacity, water spills over the edge and lands right at the foundation perimeter. That concentrated discharge often creates wet basement conditions that homeowners mistakenly blame on cracks alone.
Properly sized gutters, clean outlets, and downspouts that carry water well away from the house can dramatically reduce saturation around basement walls. In practical terms, that usually means making sure the downspouts discharge at least several feet from the foundation. On many properties, four to six feet is a baseline, though more distance is better when lot conditions allow. The right length depends on grade, soil, landscaping, and where the water ultimately goes.
There is also a difference between temporary and permanent extensions. The black corrugated plastic pieces sold at home centers are better than nothing, but they get crushed, disconnected, or removed for mowing. Buried solid pipe tied to a proper discharge point is a more reliable long-term fix. I have seen homes where buried downspout lines cut sump pump run time nearly in half during rainy weeks, simply because less roof water was being dumped into the same soil zone around the basement.
Gutters need maintenance too. No drainage plan survives neglect. A high-end waterproofing system cannot compensate for a trough full of leaves and a downspout elbow packed with grit.
Regrading the soil around the house
Regrading is one of the least glamorous improvements and one of the most important. The goal sounds simple: make the soil slope away from the foundation so surface water naturally drains outward. In reality, it takes judgment.
Many homes develop drainage problems gradually. Mulch builds up in beds, walkways settle, patios shift, and homeowners add edging, decorative rock, or raised planters that trap water against the wall. In older neighborhoods, years of small changes can leave a house sitting in a shallow basin without anyone realizing it.
A healthy grade does not need to look dramatic. It just needs enough fall to move water away efficiently without creating erosion. The first several feet around the house matter most. Dense clay fill is often used because it sheds water better than loose topsoil, but it must be shaped and compacted correctly. If the contractor uses fluffy fill and walks away, the soil may settle after one season and recreate the same drainage problem.
Regrading has trade-offs. It can affect porch steps, siding clearance, window wells, and pathways. Too much fill against a wall can create its own issues, especially if it raises soil close to wood framing or weep screed details. On brick homes with low window sills, there may be limited room to build grade safely. That is where experience matters. Sometimes a yard cannot simply be built up, so water has to be intercepted and routed another way.
Surface drains catch water before it becomes pressure
When regrading alone is not enough, surface drains can be extremely effective. These include catch basins in low spots, channel drains across driveways or areaways, and yard inlets connected to buried drain lines. Their job is straightforward: collect surface runoff and move it to a safe discharge area before it ponds near the house.
This matters most on lots with hardscape. Water moves fast over concrete, pavers, and compacted surfaces. A basement stairwell, a garage apron sloping toward the home, or a patio tucked against the rear foundation can all act like a funnel. If there is no collection point, the water sits where you least want it.
I https://andresvzeu473.slatecurrent.com/posts/best-basement-waterproofing-methods-for-heavy-rain-areas remember a house with a beautifully finished basement and recurring leaks along one rear corner. The waterproofing company had sealed cracks and installed interior drainage, but the problem kept returning during cloudbursts. The actual issue was a paver patio that had settled just enough to direct runoff toward a sliding door well and the adjacent foundation. One linear channel drain at the patio edge, tied into a solid discharge line, solved more than repeated interior patching ever had.
Surface drains must discharge somewhere legal and practical. That may be daylight on a slope, a storm drain connection where allowed, a dry well designed for the soil conditions, or another approved outlet. The collection point is only half the system. If the line is undersized, flat, clogged, or crushed, the drain becomes ornamental.
French drains and curtain drains for problem yards
The term "French drain" gets used loosely, but the concept is useful when the yard itself stays wet and sends water toward the foundation. A true French drain or curtain drain intercepts subsurface or shallow-moving water in the landscape before it reaches the house. This is especially helpful on sloped lots where uphill runoff migrates toward the basement wall.
Unlike interior perimeter drains, which manage water after it reaches the foundation, a curtain drain works outside the structure. It typically consists of a gravel-filled trench with perforated pipe, filter fabric, and a discharge route. Installed in the right location, it lowers the amount of water that ever reaches the home.
Placement is critical. Too close to the foundation and it may not intercept enough water. Too shallow and water passes beneath it. Too deep and installation costs rise without added benefit. Soil type also changes performance. In sandy soils, water moves differently than in dense clay. In some clay yards, curtain drains help, but only when paired with strong surface water control because the soil does not readily let water move into the trench.
This is one of those improvements that can work brilliantly or disappoint, depending on design. I would not recommend it as a default upgrade for every waterproofing job. I would recommend it for lots with persistent uphill seepage, wet side yards, or broad areas that remain soggy long after rain.
Window well drainage is often overlooked
Basement window wells are common leak points, especially in homes where the surrounding grade has changed over time. A window well can collect direct rainfall, roof runoff, mulch, and washed-in soil. Once the drain at the bottom clogs, the well effectively turns into a bucket pressed against the window.
Proper window well drainage usually means tying the well into the footing drain system or another suitable drain line, depending on local conditions and the home’s design. It also means keeping the well clear of debris and making sure the surrounding grade does not direct more water into it than the drain can handle.
A clear cover can help in some situations, particularly beneath roof valleys or splash zones, but covers are not a full drainage strategy. If water can still enter and has nowhere to go, the leak risk remains. Wells also need enough depth and gravel base to function properly. I have seen beautifully installed replacement windows leak simply because the old well was reused with no drainage correction.
Sump discharge management matters as much as the pump
Many homeowners invest in a good sump pump, then undo part of that benefit with poor discharge routing. If the pump sends water out through a short pipe that empties next to the house, the system may be recycling its own output. The basement stays technically dry, but the pump runs more often and the soil around the foundation remains saturated.
A proper sump discharge should carry water far enough away that it does not loop back toward the footing area. It should also be protected from freezing in colder climates. I have seen winter service calls where the pump itself was fine, but the exterior discharge line froze solid, forcing water back into the pit until the basement flooded.
The discharge point needs attention too. Sending water onto a neighbor’s property, across a public sidewalk, or into an area that turns icy creates obvious problems. In some municipalities, connection options are regulated, so local rules should always be checked. Good Basement Waterproofing includes thinking beyond the pump basin to the entire route that water takes after it leaves the house.
Dry wells and underground detention on tight lots
Some homes do not have an easy place to send water. Urban properties, flat lots, and fenced yards often limit discharge options. In these cases, a dry well or underground detention system can be a practical partner to Basement Waterproofing.
A dry well stores and slowly disperses water into surrounding soil. It can work well for roof runoff or selected area drains, provided the native soil percolates adequately. In heavy clay or in areas with a high seasonal water table, performance may be limited. That is why these systems need site-specific judgment rather than copy-paste design.
Homeowners sometimes assume a bigger dry well is automatically better. Not always. If the surrounding soil cannot absorb water efficiently, a large dry well may simply stay full. That is why drainage planning should account for rainfall intensity, roof area, lot grading, and soil conditions. When done right, subsurface detention reduces surface ponding and eases the moisture load near the basement. When done poorly, it becomes an expensive underground reservoir with little practical value.
Hardscape details can make or break a waterproofing plan
Patios, walkways, driveways, and retaining walls often get installed by separate crews with little coordination. That is where drainage failures are born. A basement may be waterproofed perfectly, only for a new concrete walk to trap water against the wall or a retaining wall to redirect runoff toward the foundation.
Hardscape should always be evaluated as part of the drainage picture. The slope of a driveway matters. So does the joint where a patio meets the house. Retaining walls need drainage behind them, especially if they sit near basement walls. If water is allowed to build up behind a wall with no relief, it can increase lateral pressure and force moisture into adjacent areas.
This is also why cosmetic renovations can trigger basement problems. A homeowner replaces old shrub beds with stone, extends a patio, and suddenly starts seeing seepage in a corner that was dry for years. The foundation did not change. The drainage pattern did.
The best improvements depend on the house, not a standard package
There is no universal bundle of drainage upgrades that suits every basement. A split-level on a steep lot has different needs than a century home on flat clay soil. The best results come from matching the improvements to the actual water behavior on site.
A good evaluation usually looks at these factors:
- roof size and where each downspout currently discharges
- grade around the full perimeter, especially at corners and entry points
- soil type, including whether it drains freely or stays dense and wet
- nearby hardscape, window wells, and low spots that collect runoff
- sump pump activity patterns during ordinary rain versus heavy storms
That kind of assessment often reveals that the "main problem" is really two or three smaller problems combining at one vulnerable area.
What tends to deliver the best value
If a homeowner asks where to spend money first, I usually look for the improvements that reduce the most water with the least complexity. In many cases, that means beginning at the roofline and working outward. If those corrections still leave the basement at risk, then more involved drainage measures make sense.
The strongest value usually comes from a sequence rather than a single product. Clean, functional gutters reduce roof overflow. Longer downspout discharge moves water farther away. Regrading sheds water at the surface. A channel drain protects a problematic patio or stairwell. Then Basement Waterproofing systems inside or against the foundation deal with the remaining moisture load. Each piece supports the next.
There is also a durability argument here. Waterproofing membranes, sump pumps, sealants, and drain systems last longer when they are not overwhelmed. Lower water pressure generally means fewer failures, fewer service calls, and better long-term basement conditions.
Common pairing strategies that work in real houses
Some combinations show up again and again because they solve the most common basement moisture scenarios.
- Interior Basement Waterproofing plus extended downspouts and corrected grading works well when the main issue is roof runoff and mild wall seepage.
- Exterior membrane waterproofing plus footing drainage is often appropriate during major excavation work or foundation repair, especially when walls are accessible.
- Window well drains plus nearby gutter correction are effective for localized leaks under egress or hopper windows.
- Curtain drains plus swale shaping help on sloped lots where uphill water moves toward the home.
- Channel drains plus sump discharge improvements make sense when hardscape funnels water toward basement doors or rear walls.
These are not rigid formulas. They are patterns that tend to perform well when matched to the right conditions.
Watch the warning signs after work is completed
Even good work should be monitored through a few heavy rains. Basements and drainage systems tell you quickly whether the plan is working.
Look for water stains that stop growing, a sump pump that runs less often than before, and yard areas that no longer stay soggy for days. Pay attention to gutters during a storm. If water still jumps the gutter edge or pools near a corner, the system needs adjustment. That does not always mean failure. Sometimes it means a downspout outlet needs more capacity or a splash zone needs reshaping.
The most useful habit is simple observation. Walk the property during and after rainfall. You will learn more in twenty minutes during a storm than from hours of guessing on a dry day.
Why integrated drainage outperforms isolated fixes
Basement moisture is rarely the result of one dramatic defect. More often, it comes from accumulation: roof water too close to the wall, grade that pitches the wrong way, a window well that fills slowly, a sump line that recirculates discharge, a patio that traps runoff. Each issue adds a little stress. Together they overwhelm the basement.
That is why the best drainage improvements to pair with Basement Waterproofing are the ones that reduce incoming water before it reaches the foundation. They make the waterproofing system’s job easier. They improve reliability. They protect finishes, indoor air quality, and structural materials. They also tend to save money over time because they reduce wear on pumps, lower the chance of repeated water events, and help avoid the cycle of patch, repaint, and repair.
A dry basement is not just a product of sealing walls. It is the result of managing water intelligently from roof to soil to discharge point. When that whole chain is addressed, Basement Waterproofing stops being a defensive measure and starts functioning as part of a complete water control strategy.
ARD Waterproofing
98 Smull Ave, West Caldwell, NJ 07006, United States
+1 917-691-8411
FAQ About Basement Waterproofing
Can you 100% Waterproof a Basement in West Caldwell?
A properly designed system can substantially reduce basement water intrusion, but no method can promise protection against every flood, equipment failure, or future change in site conditions. The first step is identifying whether moisture comes from surface runoff, groundwater, plumbing, or condensation. Solutions may include grading and gutter improvements, drainage, foundation repairs, and a sump system. Review the specific coverage and exclusions of any written warranty.
How much does it cost to professionally waterproof a basement in NJ?
There is no single price that fits every basement. Cost depends on the cause of the leak, the area needing work, access, excavation requirements, drainage design, sump equipment, and restoration of disturbed finishes or landscaping. Request an on-site assessment and an itemized written estimate that explains the scope, exclusions, and maintenance requirements before comparing proposals.
How long does foundation waterproofing last in West Caldwell, NJ?
Service life varies with the waterproofing materials, installation quality, soil and water conditions, and maintenance. Drainage components and pumps may require servicing or replacement even when other parts of the system remain functional. Keep gutters, drainage outlets, and sump equipment maintained, and have recurring leaks or changes in foundation condition assessed. Ask for product-specific expectations and written warranty terms rather than relying on one lifespan for the entire system.